
I follow strict surface finishing standards for medical components to ensure safety, hygiene, and trustworthiness. If a part is correctly machined but has an incorrect finish, it can still cause problems in the body. For this reason, I pay close attention to texture, smoothness, and overall surface quality from the start.
A proper surface finishing helps to reduce friction, improve biocompatibility, and prevent contamination. These criteria guide my work and enable me to create parts that can perform in real medical situations.
What is Surface Finishing?
A surface finish refers to the texture left on a surface after a mechanical operation or a treatment. It is determined by the size of the microscopic peaks and valleys on the surface of the part. These minute features, which may not be visible to the naked eye, have an impact on the performance of the part.
Surface finishing also reveals the movement of the tool on the material, the stability of the machining process, and whether the part will be able to seal, move, or be cleaned properly. Different surfaces can have different effects on the body’s reaction to the component.
Why is Surface Finishing Important for Medical Components?

All medical devices come into contact with tissues, blood, bones, sterilization tools, and surgical instruments, so the finish will determine the degree of friction and wear, the corrosion resistance and biocompatibility, and the ease of cleaning. A rough surface finish can serve as a bacteria trap, and a finish too smooth could lead to issues with bone adhesion. So, the right finish will simultaneously ensure safety and utility.
The Cost of a Bad Surface Finishing
I have had the unfortunate opportunity to witness the dangerous consequences of a poor surface finishing. Among many things, a rough finish could:
- Result in the part’s rejection and thus wasted time, effort, and money.
- Fail biocompatibility tests, therefore deeming the part unsafe for human contact.
- Increase the risk of infection through the adhesion of the rough surface to bacteria and other debris.
- Lead to excessive, premature wear of the medical components, especially in the joints.
- Develop dangerous stress risers leading to fatigue or fracture
- Cause loss of product due to failure to meet compliance, delaying product release
In the medical field, surface finish is the leading edge of a product. The right finish will determine whether it is a safety device or a surface that holds a dangerous flaw.
Understanding Roughness: Ra, Rz, Sa
Ra – Roughness average
Ra is one of the simplest and most popular roughness measurements. It measures the average height of small peaks and valleys on a part. A lower Ra will mean a smoother surface.
Rz – Maximum Roughness Height
Rz measures the tallest peak and deepest valley in the measured area. It helps identify weak points that will have stress concentration, which is very important for implants and components that have high loads.
Sa – Areal Roughness (3D Average)
Sa measures the roughness for a whole 3D area, instead of a single line. This is used for implants and textured surfaces where the overall geometry is more important than the single profile.
Material Check: Titanium vs Steel

Different materials react differently to machining and finishing, so I always decide the finishing process based on the material of the metal. Titanium is a strong and light metal, but it can be a bit of a challenge to polish as it heats up quickly and can form hard burrs. Therefore, titanium requires controlled speeds, clean abrasives, and careful polishing to avoid micro-damage.
While stainless steel is a good polishing material, it still needs to go through a very rigorous passivation process to remove the free iron that is left after the machining. If passivation is not done properly, stainless steel can rust and even fail biocompatibility tests, in spite of the surface appearing to be clean. Every material has to go through its own process in order to get the right finish and comply with medical standards.
The Three Essential Medical Surface Finishings
Mirror Finish: For Internal Contact
Mirror finishes are seen on products that come into contact with human tissue, fluids like blood, and bone. Some examples are implants, catheters, and precision fluid control components.
Mirror finishes are preferred on such components because they allow bacteria to slide on their surface, are less prone to friction, and remain clean through implantation and during surgeries. Typical roughness is about Ra 0.2 μm, or sometimes finer.
Some implant surfaces are required to have nanoscale smoothness, as such smoothness is necessary for attenuation of wear particles and attenuation of inflammation. This is required for long-term comfort and wear, durability, and overall biocompatibility or acceptance of the implant.
Working Finish: Tools and Housings
This finish is applicable to mechanical parts that are not implants, such as surgical instruments and housings, which are the casings of external components of devices. This is a more practical surface finish and focuses on the functional purposes served by the surface.
This working finish is a balance between cleanability and practicality for daily working surfaces.
Textured Finish: Bonding to Bone

Some parts are required to have a rough surface, which assists bone growth into the implants. This feature is particularly for orthopedic implants, such as femoral stems, and dental and spinal implants.
The rough surface increases surface area and provides something for bone cells to cling to. Without it, the implant may become loose.
The optimal bone-growth surface is isotropic, or non-directional. This allows cells to attach in all directions. The surface must be rough enough for bones to grab while remaining regulated enough to prevent stress fractures.
Technical Surface Finishing Standards: Reading the Finish Specs
The Global Language of Roughness
Worldwide language standards such as ISO and ASME are utilized by engineers to indicate the precise surface of the technical drawings. These norms make it possible for people from different countries to understand the same symbols, dimensions, and requisites used in the part wherever it is made.
This shared “language” is instrumental in error prevention and in making sure that each surface is done to the required medical quality.
Key Measurement Standards (ASME B46.1 / ISO 4287)
Such standards are the boundaries of my measurements for Ra, Rz, Sa, and other surface roughness parameters. They convey the exact speed of the probe, sampling length, and filters that I should use.
Complying with them, I am certain that my measurements are governed by the same standards used in other workshops worldwide. Such uniformity is a huge help in ensuring that the surface finish specified in the drawing is what you get, regardless of where the component is intended.
Decoding the Drawing Symbols (ISO 1302)

The symbols of the surface finish indicated in engineering drawings are elaborated in ISO 1302. I can see the basic check-mark symbol and already know the required Ra valve, the machining lay, or the direction of the tool marks, and any of the subsequent polishing, blasting, or electropolishing. Knowing these symbols helps me know what finish the blueprint specifies, so I can make the part exactly how the customer wants.
Machining the Perfect Start
Setting the Roughness Baseline
Before polishing and secondary surface finishing, there is some prep work to be done with setting up and finalizing the surface prep work done on the CNC machine. One of the major factors of surface prep is tool geometry, feed rate, and spindle speed.
When there is optimal surface prep work done on the tool, lower roughness is present, allowing for a cleaner finish and less work to be done on the surface later.
Avoiding Common Defects
During machining, there is a constant watch for the presence of several defects that can be extremely costly, lowering the surface finishing quality of the final product. Some of these, during finishing, include burrs, residual stress, microcracks, edge chipping, and burn marks.
I’ve found that closely monitoring tool wear and adjusting cutting parameters before defects show up on the surface enhances the surface quality left on the part for finishing.
Preventing Contamination
Maintaining a clean functioning environment is mandatory, especially for medical parts, where it is needed the most. New, clean, filtered tools and coolants designed for this medical work, adjacent to the manufacturing area, are standard to preserve the finish and avoid cross-contamination. Protective handling gloves, along with other medical standard anti-lint materials, are used.
Post-Machining Treatment (The Final Step)
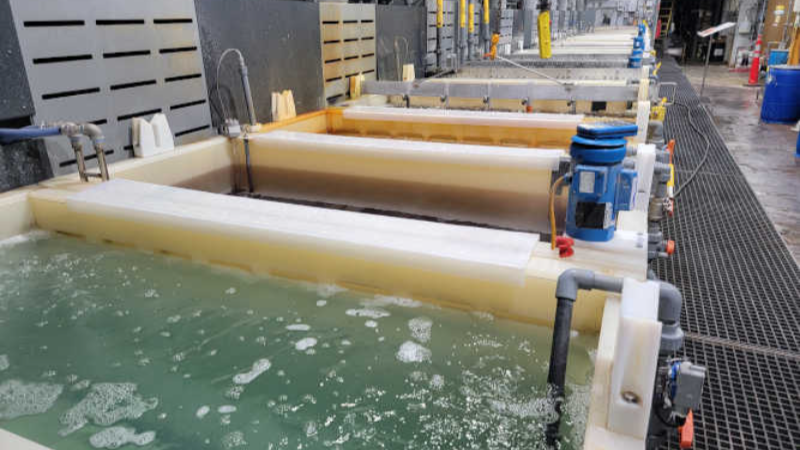
Surface Finishing Standards for Medical Components
Passivation: Clean and Prevent Rust
From my perspective, passivation is one of the best techniques to get rid of the free iron, which is adhered to the surface of the stainless steel from machining and is extremely corrosive. This is good because the passivation process forms an additional anti-corrosion layer on the surface.
Neglecting this step or performing passivation incorrectly is the greatest danger, which is why I take great care to control the conditions of the process, which makes the stainless steel of the part survive as durable and safe for use. I control all of the parameters of the process to ensure the durability and safety of the part for medical use.
Passivation Methods (Nitric vs. Citric)
Depending on the part and safety requirements, I choose different chemicals for passivation. The traditional method is nitric acid. However, as far as the safety of the workers is concerned, it is stronger, more hazardous, and generally demands more control in the handling of the acid.
Citric acid is more benign, more ecologically safe, and generally much easier to control. For medical components, I more often choose citric acid as it more efficiently removes the free iron without aggravating the working conditions and damaging the environment.
Electropolishing: Ultra-Clean Surfaces
This is an electrochemical process wherein I remove an extremely thin layer from the surface of a metal to reveal a smoother and brighter finish with an ultra-clean surface. This is a vital step for finishes on metal used on implants, surgical tools, and any other metal pieces used for handling fluids.
Electropolished surfaces are corrosion-resistant and reduce attachment of bacteria, thus providing a safe environment for use in the medical field.
Mechanical Surface Finishing (Tumbling, Blasting, Peening)
This is a process I use to refine the edges, surface uniformity, and general quality of the surfaces using specialized surface finishing tools. In vibratory tumbling, the edges are smoothed, and the part is made easier to clean. Surgical tools are made easier for us in bright light, so we micro-blast to create a glare-free matte finish.
I perform controlled blasting to fabricate a specific degree of surface roughness, which is biologically active for enhanced adhesion of bone for orthopedic implants. I apply shot peening where I want to introduce compressive stress to enhance fatigue resistance, though I apply this sparingly on medical components to prevent damage.
Quality Assurance: Measuring the Surface Finishing

The Right Measurement Tools
I have the right tools for specific measurements when checking surface finish. I use contact profilometers for measuring 2D roughness like Ra and Rz along a line. Non-contact optical scanners get 3D Sa area measurements.
Microscopes help me find and measure small defects, peaks, and valleys. I use appropriate tools for the part’s geometry for consistency and reliable measurements every time.
Key Metrics Beyond Ra
Beyond simply looking at Ra, I always keep an eye on Rz and Rmax, even if Ra appears to be fine. Rz describes the average height of the peaks and valleys, whereas Rmax depicts the greatest peak-to-valley distance. These figures are critical for parts that need to seal fluids, handle pressure, or withstand a lot of stress.
If we overlook these, we risk having leaks, parts failing due to fatigue, or wearing out prematurely. That is why I always double-check these measures with Ra to ensure the surface fulfills all performance specifications.
Consistency and Repeatability
I always measure the surface finish of each element at multiple spots to ensure it matches metal surface finish standards. I utilize statistical process control (SPC) to monitor and detect any deviations. Consistency is essential; all parts in each batch must have the same surface quality.
By monitoring and managing the process, I can assure that each component operates consistently and meets the stringent requirements for medical applications.
Compliance: Meeting FDA and ISO Rules for Surface Finishing

FDA CGMP: Process Validation
Having been recognized by the FDA, I must have documented processes that show that I can achieve the desired surface finish uniformly and reproducibly. Validation shows that each step of the finishing process is within stability, is controlled, and is documented. This instills confidence that each piece that leaves the shop is to the exact quality and safety standard that is required for medical use.
ISO 13485: Quality Systems
I have to follow ISO 13485, a globally recognized quality management system for medical devices. This certification is so valuable because it guarantees full traceability, uniformity of processes, and proper documentation at every level. This instills confidence that every piece is at the strict medical standard, and this is confidence for the customers and regulators, so that they can be sure that each part is produced and finished in a controlled and repetitive manner.
Documentation and Traceability
I document every step of the finishing process, from rough machining to the final inspection. Detailed records create a complete history of each part, detailing how each part was processed, measured, and verified. This traceability is required for effective quality control. It is also needed for compliance with regulations so that components can be differentiated to meet the stringent requirements for medical use.
Biocompatibility (ISO 10993)
The last surface finish is verified to interact with the body without causing irritation, toxicity, or any other negative reactions. Achieving this standard means all body-contacting components of the finished product are biocompatible and function as intended with the tissue, blood, and bone.
Cytotoxicity and Safety Testing
I perform biological testing to verify that the surface finish of the part is non-cytotoxic and non-irritating, including other negative effects. These tests, cytotoxicity and safety testing, determine that the part is and will remain free of any toxic residue, coatings, and/or chemicals. Meeting the requirements for these tests means the part can contact blood, tissues, or bone without causing adverse effects.
Conclusion
I have strict surface finishing standards for all medical parts. I measure tool wear, micro-smooth control, and finish validations to ensure parts do not wear out, are biocompatible, and are easy to clean. To ensure each lot is of repeatable quality, all dimensions are tracked.
Picking a trusted and certified partner is crucial. Here at MedCNCParts, true medical parts are assured with our ISO 13485 certification, full documentation, and quality control. Contact us today.


